How the MW4 Loadout Screen Is Structured (Create-a-Class Layout)
Players opening Multiplayer for the first time notice immediately that the mw4 loadout screen abandons the sprawling horizontal card menus of recent installments. On r/modernwarfare4, high-resolution Create-a-Class screenshots drew strong comparisons to Call of Duty 4 and the original Modern Warfare 3 because every core slot fits cleanly onto one readable tactical panel.
Custom slots on the mw4 loadout screen remain locked until you reach Player Level 4, forcing Levels 1 through 3 to deploy with premade Default Loadouts before your full MW4 loadout workbench opens. Once Level 4 arrives, every custom class combines seven distinct modules in a single vertical stack rather than scattering streaks and Operators across separate main-menu tabs.
The two biggest surprises for returning players are per-loadout Operators and per-loadout Killstreaks. Selecting the Operator header at the top of any class binds a specific Operator skin to that loadout, while the Killstreaks tray inside that same slot lets an aggressive SMG class run low streaks like UAV (4 kills) and Bomb Glider (4 kills) without changing your slow anchor AR class.
| Screen Module | Slot Capacity / Rule | Global or Per-Class | Practical Tip |
|---|---|---|---|
| Operator Header | 1 Operator per custom class | Per-Class | Avoid Random Operator when entering Classic Prestige to prevent perk locks |
| Primary Weapon + Gunsmith | 5 standard slots + 1 Apex slot | Per-Class | Save tuned builds before queueing so lobby transitions never strip parts |
| Secondary Weapon / Overkill | Pistol, Launcher, Melee, or 2nd Primary via Overkill | Per-Class | Pistols support full Gunsmith; Launchers accept Camos and Reticles only |
| Pick 3 Perks | Perk 1, Perk 2, Perk 3 (18 total MP Perks) | Per-Class | Pair Quick Fix + Ninja + Scavenger or Ghost + Blood Rush + Tracker |
| Equipment & Field Upgrade | 1 Tactical, 1 Lethal, 1 Field Upgrade | Per-Class | Compare MP unlocks against DMZ 3D Printer equivalents before deploying |
| Attached Killstreaks | 3 Multiplayer Killstreaks (17 total pool) | Per-Class | Match streak costs to aggressive rusher vs objective anchor loadouts |
Navigating Gunsmith, the Sixth Apex Slot, and Gunny Optimizer
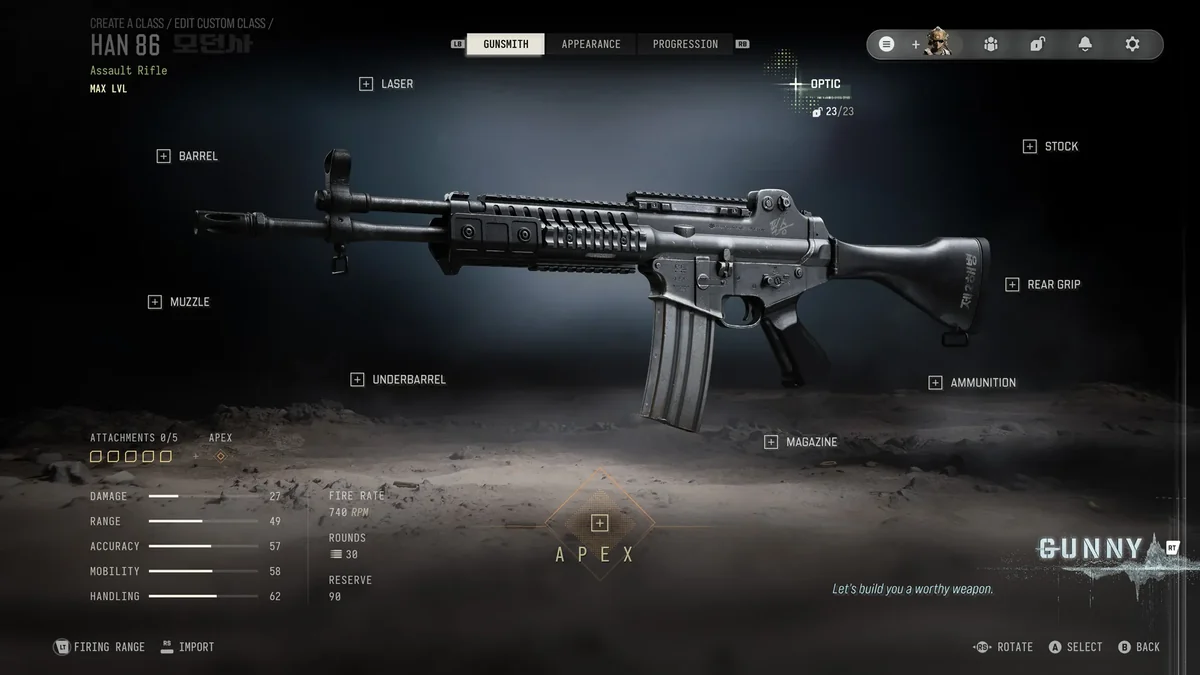
Clicking Edit on a weapon inside the mw4 loadout screen transitions straight into Gunsmith, split across three top navigation tabs: Gunsmith, Appearance, and Progression. Along the bottom-left corner, your live Attachments 0/5 meter sits directly beside a golden diamond labeled Apex, alongside numeric bars for Damage, Range, Accuracy, Mobility, Handling, Fire Rate (RPM), magazine Rounds, and Reserve ammo.
Apex Attachments unlock only after a supported firearm reaches maximum Weapon Level—for example, Level 72 on the Han 86—or through seasonal events like Wager Match for the Kastov 545 MW4 conversion. Although the Apex diamond sits outside the 5/5 cap, some transformative kits such as the HAN X20 Skybreaker automatically display a red Blocked by Apex badge over conflicting Barrel, Optic, or Stock slots.
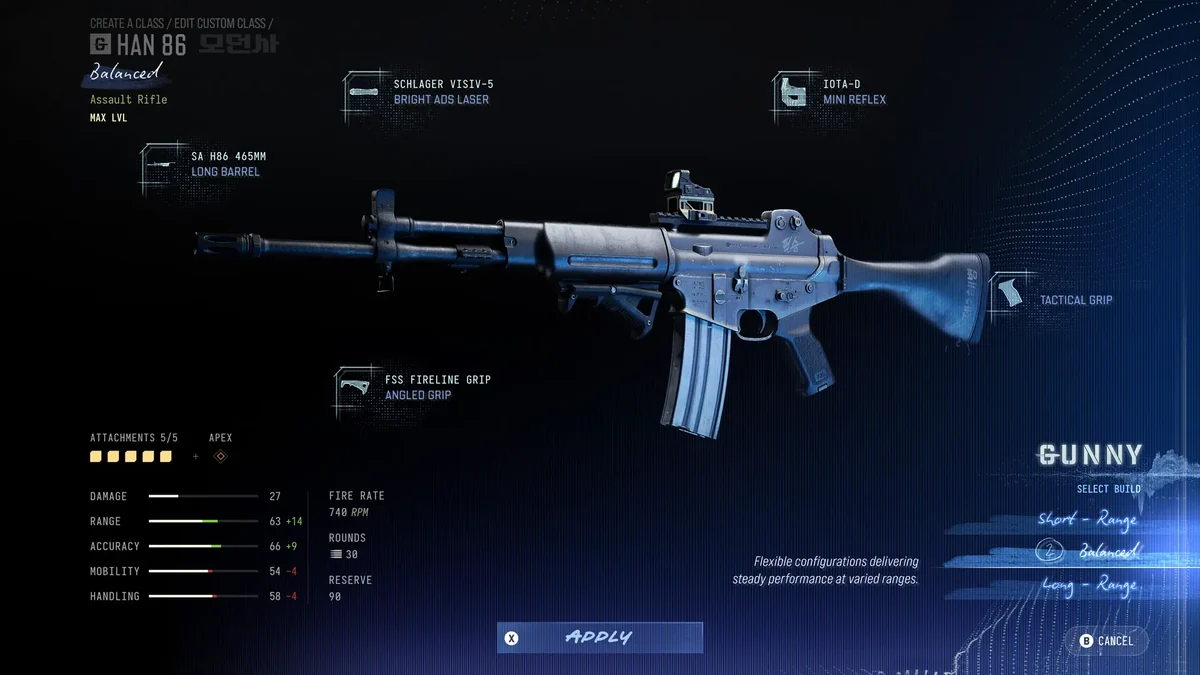
If you want a fast starting template while leveling a fresh gun, press the Gunny widget in the bottom-right corner of the mw4 loadout screen. Gunny dynamically builds Short-Range, Balanced, and Long-Range setups strictly from attachments your account has already unlocked, updating suggestions automatically as new barrels, optics, and grips open up.
Step 1: Verify Your 5/5 + Apex Attachment Budget
Check the bottom-left Attachment meter before entering a lobby. If an Apex conversion blocks your Barrel or Optic slot, fill the remaining unblocked categories rather than leaving empty slots.
Step 2: Use Save Build and Import Shortcuts
Notice the Save Build (LS) and Import (RS) prompts along the bottom bar of Gunsmith. Always save a Custom Mod Blueprint right after finalizing attachments so match-to-match lobby transitions cannot wipe your weapon.
Step 3: Cycle Multiple Loadouts Inside the Firing Range
Press Firing Range (LT) directly from the mw4 loadout screen. In Multiplayer, you can cycle between all custom loadouts without backing out, spawn dummies at 10m, 25m, 50m, or 100m with 1 to 3 armor plates, and switch between moving targets and the recoil spread plate.
Step 4: Cross-Check Appearance & Progression Sub-Tabs
Switch tabs at the top of Gunsmith to inspect Shared Attachments, Reticle challenges (Appearance -> Reticle), Camo Select, or Weapon Prestige reset thresholds before Prestige 1 relocks base attachments.
Multiplayer Loadout Screen vs DMZ FOB Gunsmith Screen
Many new players get confused when switching from Multiplayer Create-a-Class into DMZ because the two weapon screens share visual DNA while enforcing completely different economy rules. In Multiplayer, once a weapon or Shared Attachment unlocks through Player Level or Weapon XP, equipping it on the mw4 loadout screen costs nothing.
In DMZ, any weapon or attachment you leveled in Multiplayer or DMZ appears inside the Forward Operating Base (FOB) Gunsmith station, yet equipping parts requires spending DMZ Cash. You can also bring looted weapons from deployments, assemble firearms via Weapon Manuals found in Hajin, or buy base platforms from the FOB Vendor.
Another subtle difference appears in DMZ Gunsmith validation: Season 1 patches had to resolve issues where weapon stats stayed hidden in DMZ Gunsmith and weapon-select screens, where players could accidentally attempt to equip unowned attachments, and where the Helix MK.II Apex Attachment on the Cronen Osprey Vanish Blueprint showed wrong DMZ attachment costs.
Weapon XP and Shared Attachments carry between Multiplayer, DMZ, and Warzone, so leveling tough base rifles in DMZ lets you walk back into Multiplayer with every Optic and Muzzle already unlocked on your mw4 loadout screen.
Known MW4 Loadout Screen Glitches & Verified Fixes
Even with the streamlined interface, Season 1 players ran into several UI snags on the mw4 loadout screen—especially right after Prestiging or editing classes mid-match. Fortunately, Infinity Ward documented exact causes in the Season 1 Patch Notes alongside reliable player workarounds.
First, if Perks appear permanently padlocked on your mw4 loadout screen right after entering Classic Prestige, check your Operator header: a confirmed progression bug locked Perks whenever players entered Classic Prestige with Random Operator settings enabled. Assigning a fixed Operator manually and re-selecting your level-unlocked Perks restores normal slot editing.
Second, if opening Create-a-Class mid-match causes a brief UI freeze, won't let you move past a locked attachment, or strips parts back to 0/5 upon spawning, follow our dedicated MW4 loadout bug fix guide. You should also test class setups inside our external MW4 Loadout Builder and check your Classic Prestige Permanent Unlock Tokens before resetting Level 1–55 unlocks.
- Locked Perks after Classic Prestige: disable Random Operator on custom slots and confirm your Level 18 / 34 / 52 Perks via Progression.
- Kill Block 24/7 & Shipment overlap fixes: Season 1 patches resolved pre-match Loadout selection overlapping map previews on Kill Block 24/7 and Shipment.
- Gunsmith locked-attachment navigation trap: selecting a locked part previously froze cursor movement in-game; back out one menu tier or swap tabs to Gunsmith -> Progression.
- Missing DMZ weapon stats or white silhouette icons: Season 1 fixed hidden weapon stat bars in DMZ Gunsmith and white silhouette icons inside Stash, Loadout, and Backpack.
- Wager Match & match-to-match resets: avoid editing your mw4 loadout screen while actively loading into a match and always save Custom Blueprints.